In this blog post, I'll explain how to make a cool 2D silhouette effect in OpenGL. For this we are going to write a simple fragment shader, and use the stencil and depth buffers.
Since my favorite programming language is C#, I am going to use C#, but the code should be easily translatable to other languages. (Shaders are in GLSL). For the rendering I will use my own game engine which has a basic 2D renderer. Finally this post isn't for total OpenGL beginners (I won't use any advanced or niche features), so I advise you to visit this amazing website if you don't know much about OpenGL: https://learnopengl.com/
Drawing the player (tank) and the masking object (wood crate)
I will be using a free "tank assets pack" from Kenney, available here: https://kenney.nl/assets/tanks
First we need to enable blend for transparency and depth test:
GL.Enable(EnableCap.Blend);
GL.BlendFunc(BlendingFactor.SrcAlpha, BlendingFactor.OneMinusSrcAlpha);
GL.Enable(EnableCap.DepthTest);
Then we can simply render our player's tank and a wooden crate like this:
_renderer.Begin(_camera.GetProjection());
_renderer.Draw(_tank, _tankPosition, Color4.White, _tankPosition.Y / 720f);
_renderer.Draw(_crate, new  Vector2(64, 64), Color4.White, 64f / 720f);
_renderer.End();
(720 is the height of the game window, you might want to adjust this value so the depth value is always between 0 and 1)


Transparency sorting is a (hated) famous and common problem. In our case we are going to use a simple solution, which is discarding pixels with alpha value of 0. You can add those line at the end of the main function of the main fragment shader:
if (fragColor.a == 0)
{
    discard;
}

If you have sharp eyes you can see a sort of outline around the tank. This is because the tank texture has some semi-transparent pixels on the edges for making them smoother. Since this is not the main subject of this blog post, I won't go any further.
Drawing the tank's silhouette
For this we will need to write a custom fragment shader which output the tank's shape as a static color:
#version 330

in vec2 vertTexturePosition;
in vec4 vertColor;

uniform sampler2D uSampler;

out vec4 fragColor;

void main()
{
    fragColor = vec4(vertColor.rgb, texture(uSampler, vertTexturePosition).a);
}
We only use the texture to get the alpha value.
Then we are going to enable and disable the depth buffer to get the desired effect. When we disable the depth test, it use the draw order. Here is the drawing code:
// Draw the crate
GL.Enable(EnableCap.DepthTest);
_renderer.Begin(_camera.GetProjection());
_renderer.Draw(_crate, new  Vector2(64, 64), Color4.White, 64f / 720f);
_renderer.End();

// Draw the tank's silhouette
GL.Disable(EnableCap.DepthTest);
_renderer.Begin(_camera.GetProjection(), _silhouetteShaderProgram);
_renderer.Draw(_tank, _tankPosition, Color4.Red);
_renderer.End();

// Draw the tank
GL.Enable(EnableCap.DepthTest);
_renderer.Begin(_camera.GetProjection());
_renderer.Draw(_tank, _tankPosition, Color4.White, _tankPosition.Y / 720f);
_renderer.End();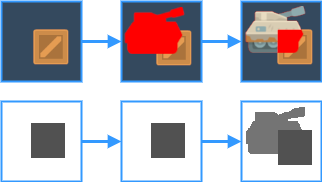
The first line is the color buffer and the second is the depth buffer. So this is what happens:
- We enable depth test.
We draw the crate with a depth value of 0.5 (example value), so we can see the crate on the depth buffer. - We disable depth test.
We draw the silhouette using the custom shader, the depth buffer doesn't change. - We enable depth test.
We draw the tank with a depth value of 0.4, because of the depth test the part behind the crate isn't visible and so we can still see the silhouette.
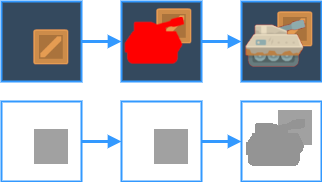
As previously, first line is the color buffer and second is the depth buffer:
- We enable depth test.
We draw the crate with a depth value of 0.5 (example value), so we can see the crate on the depth buffer. - We disable depth test.
We draw the silhouette using the custom shader, the depth buffer doesn't change. - We enable depth test.
We draw the tank with a depth value of 0.6, because of the depth test the tank is drawn over the crate and because of the draw order, in front of the silhouette too.
We could stop here, but again if you have sharp eyes (and a red silhouette) you could see something disturbing. There is a red outline all over the tank, because we are always rendering the silhouette and the tank has some semi-transparent pixels on the edges. If your textures doesn't have semi-transparent pixels, you won't have this problem, but I'll still show you a way to fix it.
Draw the silhouette only where needed
This part is like a bonus and should be applied only if your texture has semi-transparent pixels because we will be doing some extra computation (and every optimization is welcome in game development).
The goal here is to draw the silhouette only where the tank is on the crate. To do this we will be using the stencil buffer as follows:
GL.Enable(EnableCap.DepthTest);
GL.DepthFunc(DepthFunction.Less);
GL.Enable(EnableCap.StencilTest);
GL.StencilFunc(StencilFunction.Always, 1, 0xFFFFFF);
GL.StencilOp(StencilOp.Keep, StencilOp.Keep, StencilOp.Replace);
_renderer.Begin(_camera.GetProjection());
_renderer.Draw(_crate, new Vector2(64, 64), Color4.White, 64f / 720f);
_renderer.End();

GL.StencilFunc(StencilFunction.Equal, 1, 0xFFFFFF);
GL.StencilOp(StencilOp.Keep, StencilOp.Keep, StencilOp.Incr);
GL.ColorMask(false, false, false, false);
GL.DepthMask(false);
_renderer.Begin(_camera.GetProjection());
_renderer.Draw(_tank, _tankPosition, Color4.White, _tankPosition.Y / 720f);
_renderer.End();

GL.ColorMask(true, true, true, true);
GL.DepthMask(true);
GL.Disable(EnableCap.DepthTest);
_renderer.Begin(_camera.GetProjection(), _silhouetteShaderProgram);
_renderer.Draw(_tank, _tankPosition, Color4.Red);
_renderer.End();

GL.Enable(EnableCap.DepthTest);
GL.Disable(EnableCap.StencilTest);
_renderer.Begin(_camera.GetProjection());
_renderer.Draw(_tank, _tankPosition, Color4.White, _tankPosition.Y / 720f);
_renderer.End();
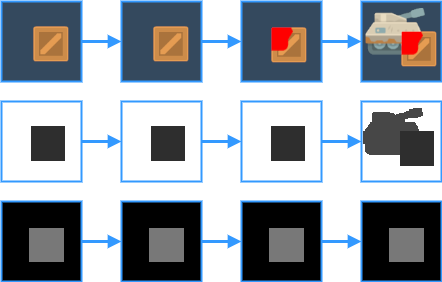
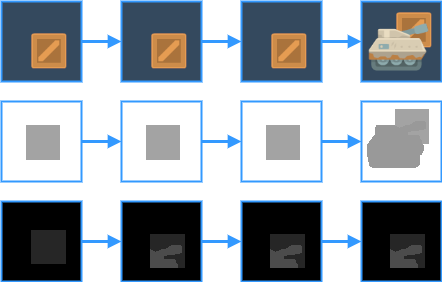
Now we have a third line corresponding to the stencil buffer. Here is what's happening:
- We enable depth test and stencil test, we set the stencil function to "always" with value of 1 and a default mask (0xFFFFFF), we set the stencil operations to keep/keep/replace. Basically it means that for each drawn pixel we will put the value 1 in the stencil buffer. We draw the crate, we can see both the depth buffer and stencil buffer have changed.
- We set the stencil function to "equal" with value of 1 and same default mask, we set the stencil operations to keep/keep/incr. It means that we will increment the stencil buffer by 1 wherever the current value is already 1 (so where the crate has been previously drawn). We set the color mask to false/false/false/false to disable color buffer writing and the depth mask to false to disable depth buffer writing.
We draw the tank and no buffer is affected because the tank is behind the crate. - We set back the color mask to true/true/true/true and the depth mask to true. We disable the depth test.
We draw the silhouette and because if the stencil test, it is drawn only where the stencil buffer has a value of 1 which correspond of where the crate has been drawn. - We enable depth test again and disable stencil test.
We draw the final tank and it looks good! No red outline is visible anymore.
The process is pretty much the same when the tank is in the front except the stencil buffer on the second step is incremented by 1 where the tank is drawn. So the silhouette isn't drawn at all during step 3.
Hope it has been useful, feel free to comment if you have any question or suggestion.